replacing the Maxxfan motor
 I installed a Maxxfan 7000-series roof vent in mid-2017 and have been brutalizing it ever since. I’d guess it runs 18hrs a day during that period.
It has a thermostat which you can set to a specific temp and it will adjust airflow to try to maintain it. When it’s colder than the set temp it closes shop (lowers the snorkel1 and turns off the fan). It defaults to 78F but I typically set it at 68F to ensure gentle ventilation even at cooler temps.
failure mode
A couple times I noticed it was warm in the van but the fan wasn’t running. I checked that
- it was in automatic (thermostat) mode
- the thermostat temp was 68F
I turned it off and on and it would start sluggishly after a couple cycles. Controller? Motor?
A few times after that I noticed it was running but spinning the fanblades slower than the slowest speed setting. While looking at it I accidentally pushed the fan shaft2 and it spun up to normal speed as long as I was pushing on the shaft. I am not well-versed in DC motors but I suspect the brush/commutator interface is worn and moving the shaft allowed the interface to happen at a less-worn spot.
I gritted my teeth and ordered an OEM replacement motor 10-20968. It’s ~$100 as seen on etrailer. Unfortunately no one was selling them on Amazon and etrailer and similar wouldn’t ship to General Delivery. So I bought one lowball off eBay and had it shipped to my remailer who would ship to GD. Total cost ~$105.
replacement part
I picked up the part at Kingman USPS general delivery and started thinking about the replacement. New part came with a connector so no soldering/splicing would be required. As far as I could tell the motor was held on by two bolts that were accessible from the inside.
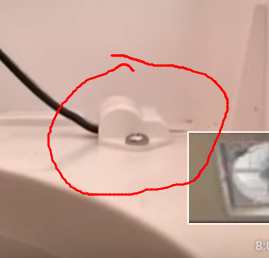
I watched this video which confirmed the general idea. One complication you can’t see from inside is the fan wire with connector goes through a moisture-blocking gland the size of your thumb. (screencap from James Condon’s video linked below) It’s held on by two screws you can’t see from the inside but they are accessible if you have a stubby phillips. The second complication is the connector goes through this gland and actually snaps into place inside the cover. So the inside cover has to be removed or loosened. Neither complication would be required if the connector were outside with the fan motor (see below). The fan has a weatherproof snorkel so it’s not like the connector would get wet. I think it was done this way for aesthetics.
repair
- remove screen
- back out grub screw holding fan blades to shaft; remove fan blades
- remove nuts/washer holding motor on to cross-braces
- get hand cramps removing screws from gland. Standing on the entry stool help ease the awkward arm position a bit
- loosen inside cover
- disconnect motor wire from male connector
- remove motor
- place new motor into position
- thread wired through gland hole
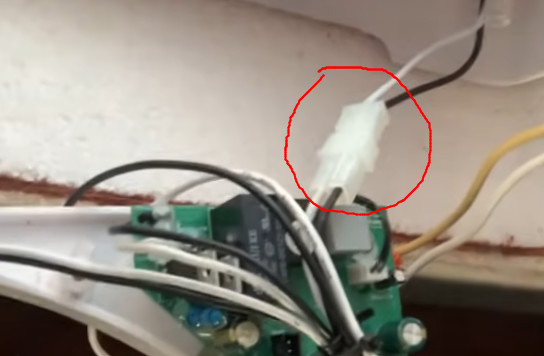
- connect female motor tamiya to male controller tamiya (screencap)
- replace gland. This was the most time-consuming part of the job. The wire needed to go through a notch in the doodad, the doodad needed to be centered over the screw holes, the screws had to be started, then the screws needed to be tightened. I found an inspection mirror to be useful here. I’d get it where it felt right then look with the mirror. It was wrong 3x and right on the fourth try.
- secure inside cover
- tighten fan motor on to braces
- ziptie wire to braces
- replace fan, tighten grub screw
- replace screen
Tested and working great.
future plans
simplifing the connection
 The plug on the fan appears to be a Tamiya Mini, Molex, or something. I am considering this course of action for the next repair:
- cut off the controller wire close to the fan and add a male tamiya
- replace motor next time connecting to the extended wire
- zipstrip excess wiring to the fan braces
This would make the whole thing a 10-minute job. If it’s not Tamiya or some other easily-sourceable connector we could cut off both and terminate with Andersons or whatever. Then it would be a 15 minute job because any new motor would need the new connector type.
rebuilding the motor
It would also be nice if I could fix the old motor and have it waiting for the next install. I suspected the motor housing would come apart easily and it was confirmed at this point in James’ video.
find non-OEM motor
Or maybe find a generic motor that could rplace the OEM. One of the video comments suggested this deer feeder motor.
OEM specs are
Motor Dimensions 2-1/2"D x 3"L
Shaft Dimensions 1-4" D-Shaped x 1-1/2"
Mounting Bolt Distance 2"
Power Source 12V DC
comments
twitter comment thread for this post