backchannel: thoughts on gnomad home’s epic guide
FIrst off, much respect to them for tackling such an extensive article. I don’t have the patience or talent to do it.
This post describes what we did with our own system based on our own research
A good start. It does not claim to be gospel.
main components
The 400w Renogy kit is fine. Could be sourced cheaper by the piece, but no biggie.
I like the 400w:155Ah ratio, especially since we are going to have an isolator installed. The 155Ah AGM is ~$360. For that money I would much rather have a set of Trojan T-105. Longer life, lower cost. If he really needs AGM I’d pony up another couple hundred for 6v AGM. Still less expensive than the 12v by the lifetme kAh.
As always, if you don’t need an inverter then don’t buy one. Overreliance on inverters was illustrated recently in /r/vandwellers, where a newbie wired a Maxxfan roof vent into inverter output. Zott! No, not all power must flow through an inverter.
They recommend the Battle Born drop-in as an upgrade. I agree, ‘though I’d like to see a warning about subfreezing use.
Although they have a higher upfront cost than lead acid batteries, they last much longer, charge faster, and can be fully discharged without damage
The lifetime kAh of a BB is almost identical to flooded golf cart batteries. Of course, there are benefits in charging efficiency, throughput, etc.
essential tools
The recommendation for an isolator comes in this section for some reason. I agree adding an isolator is cheap, strong fun for batteries. I have no problem with the Keyline isolator but Keyline’s labeling it as a “smart isolator” is misleading. They mean it is a voltage sensing relay not that it is smart in the normal sense (multistage charging).
What does all this stuff do?
I like this diagram:
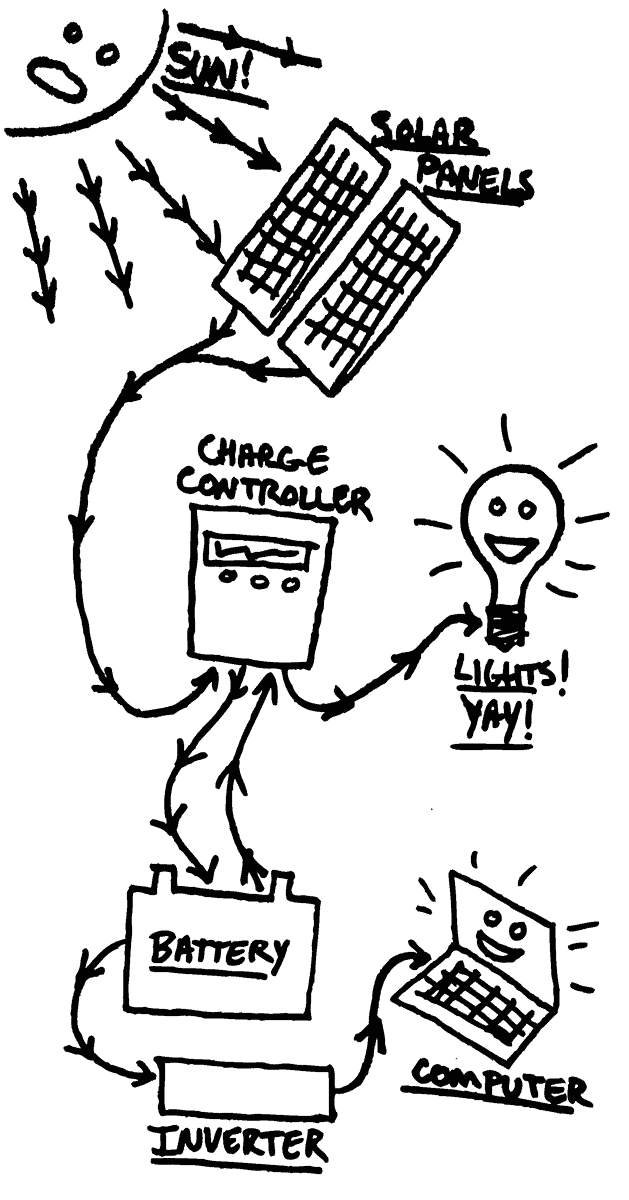
Nitpicks:
-
the LOAD output (shown here running lights) typically doesn’t power loads for most ‘dwellers. The lights are powered off the battery like everything else. Later they say “in our system, the electricity is fed from the batteries back to the charge controller, which then distributes it outward.” It’s not really “fed back” in any normal sense.
-
run your laptop off DC rather than the laptop adapter from the inverter
Figure out how many solar panels you need to fully charge your batteries each day
Solar panels are in watts, so we’ll again use our 1200 watts of power consumption. Let’s divide that by the average amount of full sunlight per day (say, 5 hours) to get the amount of solar panels we need.
Bad news: Full Sun, as expressed hours of Full Sun Equivalent (FSE) is highly variable, and rarely as good as people think wish. Specifically, only Hawaii, Arizona, and Florida average 5+ hours of FSE annually. None have 5+ hours in midwinter.
The Good news: FS are knowable data..
More bad news: lead-chemistry batteries are about 90% efficent in charging, due to the long Absorption requirements. This means the test case needs 1,320w to replace the used capacity, not 1,200w.
In addition, MPPT and heat derating will consume about 15% of solar’s yield, so we need 1,518w.under excellent conditions just to charge the bank. Using our highly optimistic 5 hrs of FSE this gives us 304w of panel. Our kit is 400w. Really not enough for solar-only charging IMO but remember we have an isolator in there. This grouch is satisfied with the 400w:155Ah + isolator setup.
Barebones Budget
I like that they are providing the option, but alternator-only charging will cut short the life of the battery. Adding shore power charging is cheap and will limit the damage.
Dropping the inverter is enough to buy a couple hundred watts of panel and a controller.
Higher Budget
They add in a DC-DC charger here. Not sure that is warranted with solar in place.
This description of overall function is excellent, and what people need to hear
And even with a system this big, we have run low on juice in certain scenarios. If we’re in overcast climates or heavily forested areas (or both) for more than five days or so, and if we’re staying in one place and not driving much, then our batteries start to get down to the 12.0V-12.2V range in the morning. But because of our system size, we can boondock longer in the same spot, in all weather and environments, and still do everything we need to do.
DESIGNING OUR SYSTEM (WITH AN AWESOME WIRING DIAGRAM!)
Having an on/off switch between the controller and battery bank is an excellent way to smoke an MPPT controller. They allude to this later: “I_mportant_: DO NOT hook up your solar panels to the charge controller until the batteries are connected.”
Parallel allows us to hook up the three panels on our roof and connect our fourth panel whenever we want
True, but the 4th should probably get its own controller, even if it’s just a $10 shunt to keep from confusing the MPPT algorithm.
With panels wired in series, if some shade gets on one of the panels the electrical output of the entire system will be affected. With panels wired in parallel, shade will only affect that one panel.
True, but affected doesn’t necessarily mean reduced. The three panels in series might actually do better under partial shade.
When you connect everything to your batteries, make sure you do it on opposite sides of your battery bank.
Correct, wiring for balanced parallel use is rarely mentioned.
summary
A well-done guide. Have a beer on me!